
Introduced recently with the MUFFIN concept, the Notebookbar is a blank canvas where controls can be placed and arranged freely. It offers all freedom to users who are not afraid to fiddle around with an integrated development environment (IDE). Here we explain how to start from scratch.
Setting up the environment
Notebookbars are ui files, which are just XML-formatted text files. Changing the files in any text editor is possible but quite tedious. The supposed way to modify ui files is to use Glade. (This may change in the future.)
After installing Glade, you have to add the LibreOffice catalog in order to use specific controls. Go to Edit > Preferences, click Add and search for the path <libreoffice>/share/glade. If all goes smoothly the LibreOffice controls will be listed in the left sidebar after restarting Glade.
Creating a new Notebookbar
Now you are able to modify existing toolbars. For Writer it is notebookbar_groups.ui or notebookbar_simple.ui at <libreoffice>/share/config/soffice.cfg/modules/swriter/ui/. Calc’s ui files are located at <libreoffice>/share/config/soffice.cfg/modules/scalc/ui/, Impress at …simpress/ui etc. Just load the ui file into Glade, modify as you like, save and switch the used toolbar in LibreOffice (no full restart needed).
But if you are afraid of messing around with the shipped files it is also possible to start from scratch. First you need to add a reference to your new ui file in <libreoffice>/share/registry/main.xcd. Unfortunately, this XML file is created during the build process without any line breaks, which hinders editing. Luckily there is the small tool called tidy that helps with formatting XML files. Rename the file main.xcd first to main.bak and run:
cat main.bak | tidy -utf8 -xml -w 255 -i -c -q -asxml > main.xcd
Now you can open the file in your preferred text editor. Search for the line with notebookbar_groups and copy/paste the complete section to duplicate it:
<node oor:name="Groups" oor:op="replace">
  <prop oor:name="Label">
    <value xml:lang="en-US">Contextual groups</value>
  </prop>
  <prop oor:name="File">
    <value>notebookbar_groups.ui</value>
  </prop>
  <prop oor:name="HasMenubar">
    <value>true</value>
  </prop>
</node>
There is more than one occurrence of notebookbar_groups.ui, one for every application. Make sure you change the section below:
<oor:component-data xmlns:install="http://openoffice.org/2004/installation" oor:name="Notebookbar" oor:package="org.openoffice.Office.UI">
//...
  <node oor:name="Applications">
    <node oor:name="Writer" oor:op="replace">
Now you change the node name from “Groups” to “MyMuffin”, the label from “Contextual groups” to “My Muffin”, and the file reference from notebookbar_groups.ui to notebookbar_mymuffin.ui.
Create the actual file notebookbar_mymuffin.ui at <libreoffice>/share/config/soffice.cfg/modules/swriter/ui/ and enter the basic stuff:
<?xml version="1.0" encoding="UTF-8"?>
  <interface>
    <requires lib="gtk+" version="3.12"/>
    <requires lib="LibreOffice" version="1.0"/>
  </interface>
You can also use Glade to create a new file or duplicate one of the other Notebookbar files and delete the content. Start Writer to see a beautiful blank canvas waiting for your creativity.
Editing the Notebookbar
To start with a very simple implementation we construct a “classic” toolbar. Run Glade and open the ui file. Click the Box symbol (first item in the section Containers) and drag it onto the blank canvas. In the pop-up dialog change the number of items to 1 (you can modify all properties later). Now add a Notebookbar toolbox (in the section LibreOffice one of the last items; the common toolbar under Containers will not work) and drop it into the GtkBox. You can resize all controls as you like, but the final alignment is done by LibreOffice.
Right click the sfxlo-NotebookbarToolbox and click Edit… In the dialog go to the tab Hierarchy and click Add. In the right hand area with properties look for Action name and enter .uno:Open there. For easy identification you can use Open at ID and delete the predefined text under Label. That would be enough to show the open icon with all the functionality in Writer.
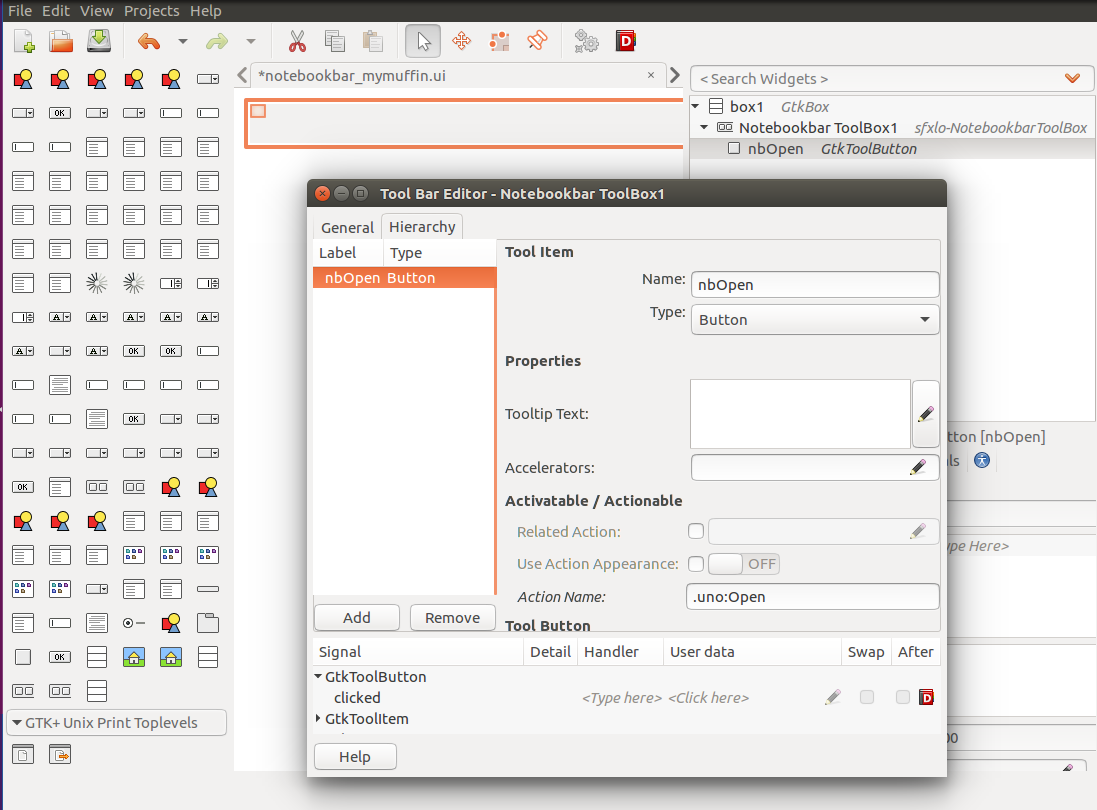
Toolbar items are defined by default as buttons and in contrast to the normal Open function you will not have menu with the additional features. You can easily change this property under Hierarchy: Tool item > Type from Button to Menu.
You may want to add more functions, so the question arise how all the functions are called and where to get help from.
.uno:What?
The .uno: commands contain all information of an entity such as name and tooltips including translation, the icon depending on the selected theme, enabled/disabled status, the actual function, etc. into a generic model. For example, .uno:Bold means the button toggles the text property bold/not bold. If you know the function by name you can find the right .uno: command in the main menu specification (menubar.xml) at <libreoffice>/share/config/soffice.cfg/modules/swriter/menubar/ (respectively for other modules in scalc/menubar, simpress/menubar etc).
And of course it makes sense to have a look at the other Notebookbars. It shows how to deal with context depending sections, how to use tabs, and how to use big buttons instead of the very simple toolbar.
Summary
You can modify existing Notebookbars at <libreoffice>/share/config/soffice.cfg/modules/<module>/ui using Glade, or add your own after editing the file <libreoffice>/share/registry/main.xcd. The Notebookbar is a blank canvas where controls can be added.
Be aware that this modifications are quite hacky and will be overridden with the next update. We are aware that this procedure is not user-friendly. The current implementation is experimental and in a very early stage. But it gives an idea what is possible.
More important is that you can also fix or improve the existing Notebookbar variants that are shipped with LibreOffice. So when you see something that can be done better, we welcome improvements as patches!
Please reach out to us on IRC in case of questions – and start hacking LibreOffice today– it’s fun!
Beware: That tidy command line will generally corrupt the content of .xcd files (as it is ignorant of significant white space), and I have no idea if there is a sound way to use tidy for this. A LO installation’s share/registry/*.xcd files are not meant to be modified manually (instead, use extensions for that).
Have You ever try to do this under Windows? Glade for Windows does not support the LO controls and does not allow to change anything.
So sorry – as Windows is still a major operation system in this world and LibreOffice should serve even this market – we need solutions for all systems.
You may notice that the post is tagged “easy hack” – so it’s not a “solution”, but a way for UI developers to contribute. Anyway, the ability to edit the NotebookBar using LO itself is in developers’ TODO list.