
Good usability means keeping software simple by supporting only those use cases that are relevant for the majority of users. But not everyone is happy with changes and misses functions for special workflows. That happened for the color palette, which was revised in the last release of LibreOffice – we reported here about color palettes. In particular the ability to save and load palettes was removed intentionally. The function has been superseded by the custom palette and the possibility to install palettes as an extension. What we can do to help the few users who need easy means to export a palette is to provide a special extension.
If you are just interested how the extension itself works, jump over to the last chapter.
Basic first
LibreOffice Basic is an easy to learn programming language. There are a plenty of good resources on the Internet, for example at the Apache OpenOffice wiki. To learn how the code works, Basic has the function to set a breakpoint (F9) where your can run the code (F5) until this position and analyze variables (aka watch F7). Be careful with the editor. It has no auto save functionality, and the workflow is not always clear.
We start with a new library per Tools > Macro > Organize dialogs… > Libraries > New (a macro could also be written with the Standard library but we want to export the code later). With edit you enter the editor where a friendly “Sub Main .. End Sub” welcomes you.
The idea is to a) read values from the custom palette, b) save it to a simple .soc files, and c) pack it into a zip file with the needed overhead for extensions.
Save data to a file
Let’s start with simple file access. Looking for the topic with your preferred search engine reveals how it works in general:
'create an object the has all methods from the class SimpleFileAccess
oSFA = createUNOService ("com.sun.star.ucb.SimpleFileAccess")
'assign a file
oOutStream = oSFA.openFileWrite(“c:\hello.txt”)
'connect an output stream to write data
oOutText = createUNOService ("com.sun.star.io.TextOutputStream")
oOutText.setOutputStream(oOutStream)
'write data
oOutText.WriteString("”Hello World”)
'close the stream
oOutText.closeOutput()
Pretty easy, isn’t it. The extension requires xml files, for example the description.xml, which can be done by this simple method (although we need to deal with xml later). Values are typically double-quoted, and since this character is reserved in Basic we have to concatenate the string using “& Chr(34) &”.
Read values
Normal palettes such as html.soc are stored in a separate path – but not the user-defined values. To find out how these colors are handled we can save a custom color under a certain name and grep the user directory; searching with your file browser does the trick as well. It turns out that we have to process the file registrymodifications.xcu, an XML file.
<item oor:path="/org.openoffice.Office.Common/UserColors">
  <prop oor:name="CustomColor" oor:op="fuse">
    <value>7512015 958228</value>
  </prop>
</item>
<item oor:path="/org.openoffice.Office.Common/UserColors">
  <prop oor:name="CustomColorName" oor:op="fuse">
    <value>
      <it>Fooblue</it>
      <it>Bargreen</it>
    </value>
  </prop>
</item>
LibreOffice Basic has the simple API for XML (SAX) implemented, however not really simple for non-developers. But with help of the AOO Fastparser page we only need to listen for the right line and collect the values. Two functions are interesting:
Private ColorValues() As Long
Private ColorNames(0) As String
Dim aColorEntry As Integer

Sub DocHandler_startElement( cName As String, oAttributes As com.sun.star.xml.sax.XAttributeList )
  'we are looking for nodes with the keyword item
  If cName = "item" Then
    aName = oAttributes.getNameByIndex(0)
    aValue = oAttributes.getValueByIndex(0)
    if aValue = "/org.openoffice.Office.Common/UserColors" Then
      aColorEntry = 1 'the current line should be analyzed
    Else
      aColorEntry = -1
    End if
  End If
  'and nodes with the keyword prop
  If cName = "prop" And aColorEntry = 1 Then
    aName = oAttributes.getNameByIndex(0)
    aValue = oAttributes.getValueByIndex(0)
    if aValue = "CustomColor" Then
      aColorEntry = 2 'key contains a custom color value
    End If
    If aValue = "CustomColorName" Then
      aColorEntry = 3 'key contains the color names
    End If
  End If
End Sub

Sub DocHandler_characters( cChars As String )
  If Len(cChars)>1 Then 'no empty strings
    If aColorEntry = 2 Then 'it’s the custom color values, separated by spaces
      ColorValues = Split(cChars," ")
    End If
    If aColorEntry = 3 Then 'it’s a custom color name, one of the sequential items
      z = UBound(ColorNames)
      ColorNames(z) = cChars
      ReDim Preserve ColorNames(z+1)
    End If
  End If 'empty String
End Sub
So we have all together to read out the custom colors and write it to external files. Packing into a zip is the last piece.
Pack the files
That’s surprisingly easy, compared to the other tasks.
'create a package
oZipPackage = createUnoService("com.sun.star.packages.Package")
'define the package to be a standard zip since we create our own manifest.xml
Dim aArg As New com.sun.star.beans.NamedValue
aArg.Name = "PackageFormat"
aArg.Value = False 'plain Zip format
oZipPackage.initialize(Array(sFileName,aArg))
'add files to the package
addToZip(oZipPackage,<path>,<file>)

Sub addToZip(oZipPackage As Object, ByVal sPath As String, ByVal sFile As String)
  Dim aArgs(0) As Variant
  aArgs(0) = False
  'connect a stream with simple, read-only file access
  oZipPackageStream = oZipPackage.createInstanceWithArguments(aArgs())
  oSimpleFileAccess = createUNOService("com.sun.star.ucb.SimpleFileAccess")
  oInputStream = oSimpleFileAccess.OpenFileRead(sPath & sFile)
  oZipPackageStream.setInputStream(oInputStream)
  'insert the file
  oZipPackageFolder = oZipPackage.getByHierarchicalName("")
  oZipPackageFolder.insertByName(sFile,oZipPackageStream)
  'save
  oZipPackage.commitChanges()
  oInputStream.closeInput()
End Sub
User input
Finally we need to define the variables. They are the name of the exported palette, the filename of the extension, an identifier in order to allow more than one exported palette, and a version number for updates. Not to forget the publisher info. For most flexibility we ask the user in a simple dialog.
Open Tools > Macros > Organize Dialogs…, select the current library at the dialog tab and add a dialog per New. With Edit (or double clicking the node) you go into the edit mode. Controls can be placed freely on the new dialog using the dropdown at the toolbar. Some controls have properties that are set here, like the caption of label fields (“label” in the properties editor).
But we can also do that from the code. Assuming we named the library Test and the dialog MyDialog and we have a label with the name lbTest the code could be
'Load dialog
DialogLibraries.LoadLibrary("Test")
'assign it to a variable
oDlg = CreateUnoDialog(DialogLibraries.Test.MyDialog)
'insert some values
oDlg.getControl("lbTest").setText("Hello World")
'show the dialog
oDlg.Execute
The command to gather the user input would be oDlg.getControl(<name>).getText(), which of course makes sense only for input controls.
Another property of controls are events that execute a procedure on focus change, modification of values, execution, and key or mouse events – available depending on the type of control. Create a new procedure in your code, e.g.
Sub OnExecuteFile()
  'create file dialog
  oFileDialog = CreateUnoService("com.sun.star.ui.dialogs.FilePicker")
  'show dialog
  If oFileDialog.Execute() Then
    aFileName = oFileDialog.Files(0)
  End If
  oFileDialog.Dispose()
End Sub
…and assign the execute method of a button with this procedure to show a file picker when the button is pressed.
Create an extension
Once the code is fully functional you may want to share it with others. LibreOffice has the option to export the code as an (rudimental) extension via Tools > Macro > Organize dialogs… > Libraries > Export… as extension. The file is a zip packed container of the code, the dialog, and a manifest. You need to add the description.xml and some other files such as icons (side note: you need to use magenta for transparent pixels), license etc. If the extension should be assigned automatically to a menu entry and/or a toolbar button you may also want to add the file Addons.xcu, an xml file where at the menu and/or toolbar the new item is placed, for what modules it should be available, and what procedure should be executed on click.
<!-- Place it at the Tools menu under Macros -- >
<prop oor:name="MergePoint">
<value>.uno:ToolsMenu\.uno:MacrosMenu</value>
</prop>
<!-- Available for Writer, Calc, Draw, and Impress -- >
<prop oor:name="MergeContext" oor:type="xs:string">
<value>com.sun.star.text.TextDocument, com.sun.star.sheet.SpreadsheetDocument, com.sun.star.drawing.DrawingDocument,com.sun.star.presentation.PresentationDocument</value>
</prop>
<node oor:name="MenuItems">
<node oor:name="M1" oor:op="replace">
<!-- Label of the menu entry -- >
<prop oor:name="Title" oor:type="xs:string">
<value>Export Custom Palette...</value>
</prop>
<!-- Run Sub Main() in Module1 from the CustomPaletteExport macro -- >
<prop oor:name="URL" oor:type="xs:string">
<value>vnd.sun.star.script:CustomPaletteExport.Module1.Main?language=Basic&location=application</value>
</prop>
… (content shortened)
Extensions are shared at https://extensions.libreoffice.org/. Just follow the more or less obvious steps on this platform.
Custom Palette Export
You can download the extension at https://extensions.libreoffice.org/ and add it via extension manager (ctrl+alt+E / Tools > Extension Manager…). The Custom Palette Exporter adds a menu item to the Tools menu under Macros. On click you are presented with a dialog where you have some choices to made:
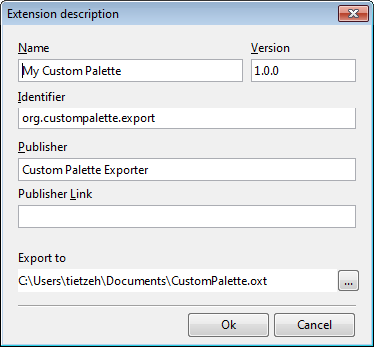
- Name: The name of the palette that will be used in the color picker and at the extension manager
- Version: Extensions have a version number.
- Identifier: Every extension is identified by this value and not the name. Enter a unique string here to install more than one color palette on the target system. Of course, if the extension is updated with a new version number you should keep the same name.
- Publisher and publisher link: These information will be shown in the extension manager.
- Export to: Select path and filename of the extension itself. Click the button right of the input field to modify the default value. Existing files are overridden.
When started without any custom color a message box pops-up that nothing is to export. Keep in mind that you have to restart LibreOffice after modifying the custom palette to actually store the changes in the registry.
Many thanks to Niklas Johansson for his contributions to the code.
Thank you both very much for the extension and the blog post. I encountered a bug: On Win10 I only can use an export path and filename that already exists and I can’t define a new, not-yet-existing name for the extension.
The path must exist but the filename is free to set as new. Maybe the initial value is wrong, checked that right now under W7 where the URL is being used instead of the path. Just enter a new name in the filepicker (file:///C:/Users/tietzeh/Downloads/Test1.oxt -> test.oxt)
Hey Heiko,
Can you write an extension to import pallate files into LibreOffice?
What’s wrong with that one discussed in this article? https://extensions.libreoffice.org/extensions/custom-palette-eport (exports the custom palette and imports this under a unique name given on export)
No, I means create an extension again to add a menu item to allow users importing any palatte files into LiberOffice. Currently LibreOffice does not have an interface to import GIMP Palette and Adobe Swatch Exchange files, such extension would give more conveniences for users.
You mean https://bugs.documentfoundation.org/show_bug.cgi?id=92354. No, that’s not in-scope of my extension, though possible. Keep in mind that any palette or other import could only place the file in the user space. And of course feel free to enhance my extension.
“In particular the ability to save and load palettes was removed intentionally. ”
WTF!?
So help me God, I have never seen so much arrogance — not even from Microsoft or Adobe! Removing the ability to load and use customized color palettes has always been a weak point in *office, but to arbitrarily remove our ability to import and export custom palettes is NOT an “improvement” .
Requiring users to go back to college and earn a CompSci degree to begin to comprehend the sublime elegance and beauty of your XML code snippets really makes us admire how much smarter believe you are than us mere insects (in your view.)
I agree with droumanet ans volga — As a user, I just want to use your program to get my work done. To the extent your program denies me that ability the more I begin to advise others to avoid your product and look for one written by developers who value and respect their users.
The old sysadmin joke was “This would be a great job if it wasn’t for the users,” and the irony (apparently lost on you) is that without users, there is no reason for your precious code.
*argh* what’s happened to my corporate palette colors ? I’ve to import it manually in C:/users/xxx/AppData/Roaming/LibreOffice/4/user/config
Easy to found :(
I don’t understand : design and UI are supposed to make an application easier to users… not the opposite !
And now, how could I change my own colors… using Notepad++ ? great… I should leave my mouse and great GUI to write some XML codes : hope my grand’ma would be able to learn this language ;)
I’m sad because since few versions, I felt that users aren’t in the objectives of LibreOffice (appart the well done new menu bar replacement). But like this, someone else have to develop an extension (that would enhance version compatibilities problems).
Use the final extension to export a user palette to “Corporate branding” and import this on all your workstations.